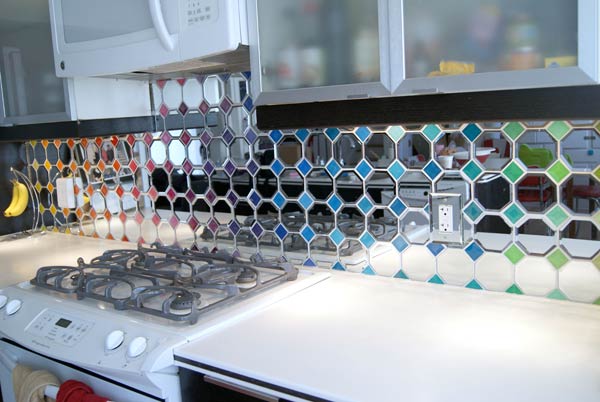
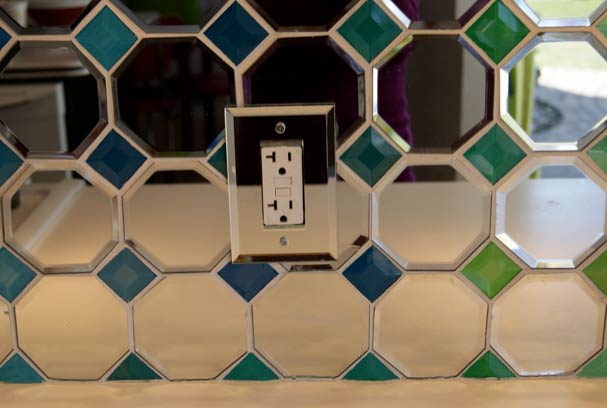
So, I mentioned in the original 30 Days of Muchness that I finally, after 17 months, completed my backsplash!!! Its been a couple of weeks and I’m LOVING it. It is exactly what I envisioned, and the feedback I’ve gotten is super.
So now, I’m just gonna give a little bit of background;
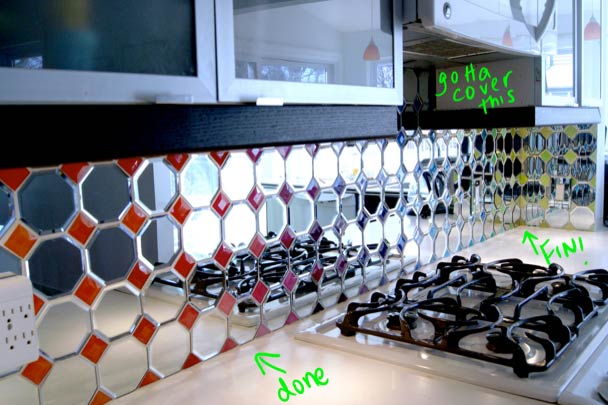
I used mirrored coasters from Amazing Savings. That’s like a dollar store but much more awesome. I’d been looking for almost 18 months for the right material for the backsplash… I didn’t want something ordinary and I really wanted something colorful that sparkled but wasn’t 800,000 gazillion tiny rhinestones glued to the wall (like my wedding shoes.) I saw the coasters, at a buck apiece and knew I’d hit the jackpot. I slapped those suckers on the wall with tile adhesive. Except the ones that had to get cut to fit the edges… took a while to figure out how to do that.
But what to put in the 1.5″ space between them? Tiles don’t usually come in 1.5″ and besides, I couldn’t really decide on a color to commit to. Many months of online searching led me to clear beveled tiles, available in 1.5″. They were about 65 cents a piece. All together that brought me to around $13 per square foot in tiles.
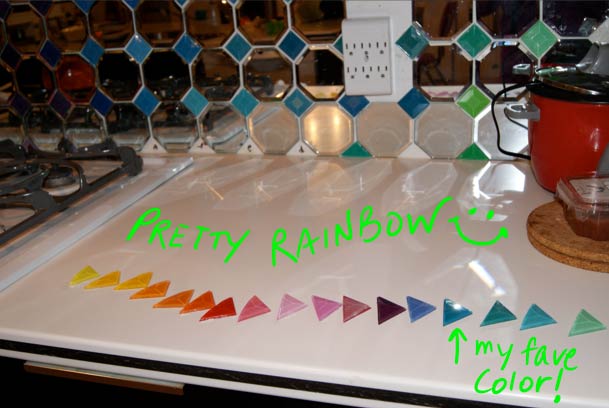
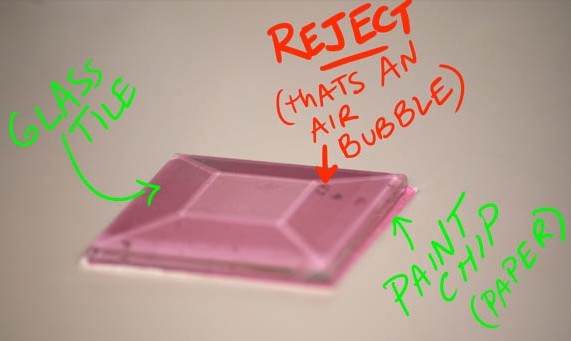
I don’t know where the idea to use paint chip samples came from, but thats what I used to “color” the glass. I swiped a crapload of swatches from home depot and layed them out in a gradient format. I numbered the spaces and numbered the swatches and started glueing the glass to the paint chips. and I glued. and glued. Then I started mounting them on the wall with the tile adhesive. But it was water based and started softening the paper and I started to see air bubbles between the paper and glass. For some tiles, it was too late and I have learned to live with it. No one really sees it but me. But I switched to a highly toxic marine glue that had no water in its base and dried really quickly. most of the tiles used that and they are perfect.
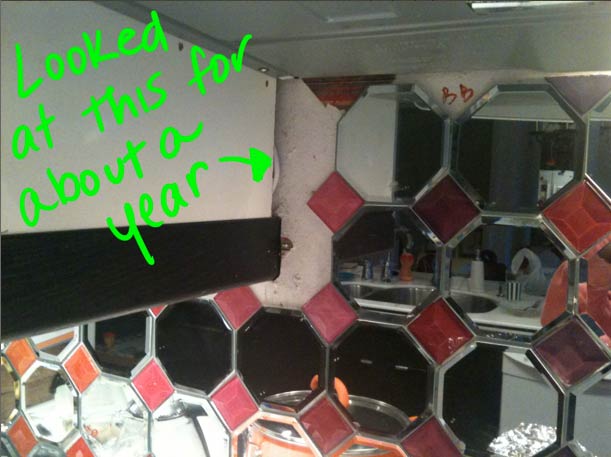
I bought a handheld rotary glass cutter to cut the tiles and was able to snap the glass ones in half with no problem for the edges. But the mirrors were too thick to cut that way. Eventually I brought the mirror tiles to a professional glass cutter who charged me $5 per cut. That added almost $250 bucks onto the total price, which sucked, but the results were worth it.
So, it took 17 months because I can get kind of lazy. I also had a pregnancy (where I didn’t work on it at all) and baby over that time.
I thought I had more pics of the clear glass tiles and the paint chips before they were glued together, but apparently I’ve sniffed so much glue I don’t know what I’m talking about cuz they are nowhere to be found.
Oh- after it was all done I grouted it. With grout. Unsanded. And I had to push the grout up into the spaces with my fingers cuz the spaces were so unbalanced with the the beveled edges, and also I didnt wanna scratch the mirrors with a tool pushing too hard.
Also- the mirrors areall handcut and no two were identically sized, so the grout lines are all unbalanced. I like that because it adds character and meant I only had to keep my tile lines parallel and straight- not perfectly perfect.
Synopsis:
Total time: 17 months, start to finish
Total cost: Mirror tiles- about $175
Glass tiles- about $110
Glass cutting tools- about $40
extra to cut mirrors professionally – about $250
grout, adhesives & glues- about $40
mirrored outlet covers- $10 / pc x 3 = $30
TOTAL: about $645.00 Certainly not the cheapest option available…. but no one else will have anything like it, and that’s, to me, priceless.



Very cool and looks like most anyone can do it – maybe – But very fun!!!
I love it! Great job! looks like jewelry for the kitchen! Thank-you for the details!
Youre so welcome Robin! It was like jewelry for the kitchen! Love that description!
ARE YOU KIDDING ME?!?!?! This is totally amazing and gorgeous..and WHERE are all the comments?! Well those non-commenters are just whack – this is by far one of the most unreal DIY projects I have seen in blog world!!! Nice job – rockin idea!! and totally creative….
Tile cutter guy kinda put the squeeze on you – but I would’ve paid it too!
thanks for sharing!!! going to look at your rhinestone shoes now :o)
Julie- you are my most favorite person of the
dayweek!! Thank you!!! You can come to my house any day for a BBQ and to look at my backsplash. 😀Yeah??? Where are all our comments??? I swear I commented on this before…. 🙂
Nope. I think the beauty and talent just leaves everyone dumbstruck for words. 🙂
Tine- you left a comment on decorhacks where it was featured.
Very pretty. What an artistic idea you must be so satisfy with this great kitchen wall art. You are right, its priceless. 🙂
OMGOSH what a BEAUTIFUL,LOVELY KITCHEN!!!!!
SUPER GREAT IDEA. I JUST LOVE EVERYTHING ABOUT THIS PROJECT!!!!!
You must be so proud of yourself if not you should be. Again GREAT JOB!!!
I will be pinning this one. Question does it make your kitchen look and feel larger? I have a tiny kitchen that I need faux largeness added to it. Thanks for sharing your great talent with us!!!!! Linda
Hiya Linda!
Thanks SO much! I am so glad you like it!
It definitely makes it feel larger and more open. Before the mirrors I’d had scrapbook paper that looked like faux tiles on the wall. It was cool but definitely enclosed the area. Now, it reflects light from the windows so nicely. I was warned that a mirror backsplash is hard to keep clean and reflects clutter making everything feel more clutterful. I haven’t found that at all, and I’m very cluttery. Or, if it subtly does, it helps keep me motivated to clear my counters so I don’t block the view of my backsplash. 🙂
It’s been almost 3 years and I honestly still love it as much as I did the day I finished it.
That’s rare, ya know?
This is the most creative idea I have ever seen! A lot of work but so worth the effort! It’s so beautiful and upbeat! Congrats on a great job Tova and please come up with some more creative ideas to post!!
Thank You Laurie! I have done so many projects since, but have fallen out of the blogging habit. I miss it though… thanks for the incentive to keep sharing!
This is absolutely lovely! One suggestion would be to use glass paint (I know, another expense…) on the back of the glass tiles. You bake it on and it becomes permanent, and I suppose you wouldn’t have had to pay extra for that adhesive. Truly amazing.
Thanks Lea! I imagine that glass paint wouldve cost more than the adhesive. lol. 🙂
Wow, your work is impressive. So much dedication and creativity! I’m an architect and I’m delighted by your beautiful design. Keep the good ideas coming!
Thank You Maria and thanks for the encouragement to keep sharing my creative projects. I’ve got a bunch that I’ve never shared…
SMACKTACULAR
LOL- Thanks! 🙂