Teeze. Really? Teeze? Ha. That’s Funny.

Once upon a place, in a time called “My 20’s”  I started a handbag company. Actually, it started as a custom pants company. Custom Leather and Vinyl Pants. And They Were HOT. It was the late 90’s. Trust me. They were hot. Especially in overcrowded nightclubs. I even made a pair for for this guy:

Paul's my friend. He's also Debbie Harry's Friend. She is so cool. And he's pretty hot.

Paul's my friend. He's also Debbie Harry's Friend. She is so cool. And he's pretty hot.

Anyhoooo, I named my company Teeze. Why Teeze? Well, some  of my friends called me T. And the company was mine. T’s. Belonging to me. Get it? …and then I just spelled it cute.

It wasn’t long before I realized that I don’t wanna be all-up in people ‘business’ fitting them for custom pants, so I decided to focus my efforts on handbags. So Teeze Custom Pants became Teeze Accessories & Stuff, Inc. (I added the “Stuff” so I wouldnt pigeonhole myself. Always thinking ahead…)

And ya know what? I was pretty successful for a one woman army. My bags were manufactured in New York and overseas in China, and I sold them all over the world. You can read a bit about it here. (I wish the online version showed the pic that ran in the print addition. Gosh, I looked cute)

But then, after about 6 or 7 years, I decided to let my company be “adopted” by a large handbag company that were gonna help me grow. But, turns out, they were run by a real dumbass and they pretty much screwed me over by default. It was right around that time I met the current Mr. Gold and decided to focus on me instead of my bags.

I got a job, got married, got pregnant, got a house, put all my leftover bags in the basement of said house, and pretty much settled into this new phase of my life.

Until now. Until I got struck by The Muchness bug. Now, I feel like I felt when I was 19 and thought I could change the world with a pair of pants or a handbag.

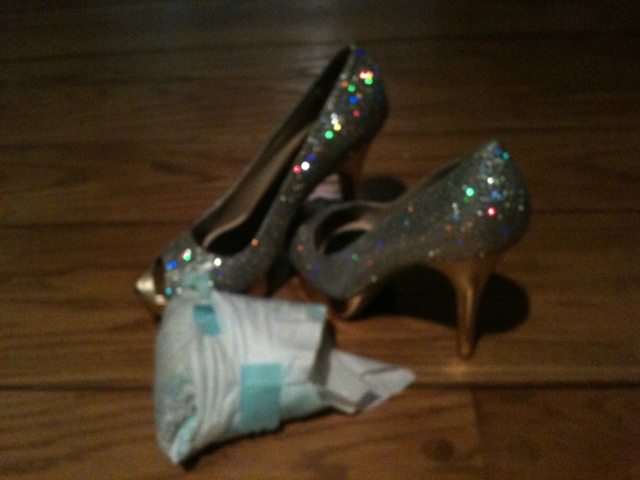
And then today, I was randomly trolling the internet for sequined shoes (that kind of search can take you to some kooky websites!) and came upon these. I love these shoes.

Those sequins are two sided- changing colors of they’re angled up or angled down! I get it. I can see that these shoes are all kinds of tacky, but I don’t care.  They make me smile, and, with the buckle, closed toe and super high front platform- look like they’d be (relatively) comfortable and (relatively) versatile. But the thing that put me over the top and made me wanna write this post?

THEY ARE NAMED TEEZE!!!

oy. I can’t. No really. Check it out. That’s their name.

Maybe it’s a sign.

IN TOUCH WITH THE MUCH

Went to a wedding last week and there were tons of people wearing sparkle. It was festive and pretty but I quickly realized that not all sparkle is actually Muchness. And by extension, not all Muchness is sparkle.
For example:
This woman is in Touch with the Much.

20110328-083107.jpg

This skirt, not so much

20110328-083235.jpg

It’s like I really, really wanna like it. It’s got all the ingredients:
3-4 types of sparkle, various textures, seemingly random placement of sparky Trim. And yet, that skirt depresses me somehow. Takes itself so seriously. Tries soo hard.
Maybe it was the wearer. Maybe on someone with different energy- and a different shirt, I’d think differently. Something to think about.
One more sneaky pic:

20110328-083700.jpg
This lady looked lovely. The whole dress was a dark blue sequin. But then I got close and realized there was a soft chiffon layer covering the whole entire dress. You can see the halo it creates on her sleeve. It looked pretty but I thought- why would you want to tame the Muchness??

The Backsplash


So much Muchness!

So, I mentioned in the original 30 Days of Muchness that I finally, after 17 months, completed my backsplash!!! Its been a couple of weeks and I’m LOVING it. It is exactly what I envisioned, and the feedback I’ve gotten is super.

So now, I’m just gonna give a little bit of background;

I used mirrored coasters from Amazing Savings. That’s like a dollar store but much more awesome. I’d been looking for almost 18 months for the right material for the backsplash… I didn’t want something ordinary and I really wanted something colorful that sparkled but wasn’t 800,000 gazillion tiny rhinestones glued to the wall (like my wedding shoes.) I saw the coasters, at a buck apiece and knew I’d hit the jackpot. I slapped those suckers on the wall with tile adhesive. Except the ones that had to get cut to fit the edges… took a while to figure out how to do that.

But what to put in the 1.5″ space between them? Tiles don’t usually come in 1.5″ and besides, I couldn’t really decide on a color to commit to. Many months of online searching led me to clear beveled tiles, available in 1.5″. They were about 65 cents a piece. All together that brought me to around $13 per square foot in tiles.

I don’t know where the idea to use paint chip samples came from, but thats what I used to “color” the glass. I swiped a crapload of swatches from home depot and layed them out in a gradient format. I numbered the spaces and numbered the swatches and started glueing the glass to the paint chips. and I glued. and glued. Then I started mounting them on the wall with the tile adhesive. But it was water based and started softening the paper and I started to see air bubbles between the paper and glass. For some tiles, it was too late and I have learned to live with it. No one really sees it but me. But I switched to a highly toxic marine glue that had no water in its base and dried really quickly. most of the tiles used that and they are perfect.

I bought a handheld rotary glass cutter to cut the tiles and was able to snap the glass ones in half with no problem for the edges. But the mirrors were too thick to cut that way. Eventually I brought the mirror tiles to a professional glass cutter who charged me $5 per cut. That added almost $250 bucks onto the total price, which sucked, but the results were worth it.

So, it took 17 months because I can get kind of lazy. I also had a pregnancy (where I didn’t work on it at all) and baby over that time.

I thought I had more pics of the clear glass tiles and the paint chips before they were glued together, but apparently I’ve sniffed so much glue I don’t know what I’m talking about cuz they are nowhere to be found.

Oh- after it was all done I grouted it. With grout. Unsanded. And I had to push the grout up into the spaces with my fingers cuz the spaces were so unbalanced with the the beveled edges, and also I didnt wanna scratch the mirrors with a tool pushing too hard.

Also- the mirrors areall handcut and no two were identically sized, so the grout lines are all unbalanced. I like that because it adds character and meant I only had to keep my tile lines parallel and straight- not perfectly perfect.

Synopsis:
Total time: 17 months, start to finish
Total cost: Mirror tiles- about $175
Glass tiles- about $110
Glass cutting tools- about $40
extra to cut mirrors professionally – about $250
grout, adhesives & glues- about $40
mirrored outlet covers- $10 / pc x 3 = $30

TOTAL:  about $645.00  Certainly not the cheapest option available…. but no one else will have anything like it, and that’s, to me, priceless.

Pretty, Pretty Dresser

I got this for free. My uncle had it in storage. I saw it and said “That’s pretty.” He said “Take it”. I did. It sat in the basement till I had a baby and therefore, enough time to refinish it. Then it took me an additional 3 more months to put in the mirrors. The last, easiest step always takes the longest…

What do you think?

Dresser Detail before

Dresser Detail Before

Dresser before, top hutch

Dresser before, top hutch

Dresser before-bottom

Dresser before-bottom

Ain't it perty?

After!

Silver Paint pen!  


After Door Detail

Hello, Hello Kitty!

The mirrors add the Muchness!